TSoM eMMC Programming Guide revB1
From Terasic Wiki
(Difference between revisions)
(Created page with "This guide will show you how to program the Linux image into the eMMC device on the TSoM module and explain how to update device tree and zImage in the eMMC device. = ...") |
(→1.1 Re-flash linux image to emmc memory) |
||
| (10 intermediate revisions not shown) | |||
| Line 5: | Line 5: | ||
#Prepare a SD card reader and a Micro SD card (minimum 4GB capacity,for Linux boot). | #Prepare a SD card reader and a Micro SD card (minimum 4GB capacity,for Linux boot). | ||
| - | #Download the image file form the link below and use the tool such as " | + | #Download the image file form the link below and unzip it, then use the tool such as "Win32 Disk Imager" or “Rufus” to write the linux image file(tsom_linux_mp.img) into the Mircro SD card. |
| - | #: | + | #:https://download.terasic.com/downloads/cd-rom/tsom/linux_BSP/tsom_linux_mp_v1.2.zip |
| - | + | ||
| - | + | ||
| - | + | ||
| - | + | ||
| - | + | ||
#Insert the Micro SD card into the TSoM evaluation kit. | #Insert the Micro SD card into the TSoM evaluation kit. | ||
| - | #Make sure SW2 is set to FPPx32 mode( | + | #Make sure SW2 is set to FPPx32 mode(See the picture below), so the FPGA can be configured by HPS. The factory default mode is the FPPx32 mode. |
#:<div style="text-align:left;color:#4a4a4a;">[[Image: TSOM PTE revB-002.png|550px]]</div> | #:<div style="text-align:left;color:#4a4a4a;">[[Image: TSOM PTE revB-002.png|550px]]</div> | ||
#Make sure that SW1 on the TSoM is switch to the "ON" position, which represents the HPS boot from the SD Card. | #Make sure that SW1 on the TSoM is switch to the "ON" position, which represents the HPS boot from the SD Card. | ||
| Line 24: | Line 19: | ||
#:<div style="text-align:left;color:#4a4a4a;">[[Image: TSOM PTEEMC-004.png|650px]]</div> | #:<div style="text-align:left;color:#4a4a4a;">[[Image: TSOM PTEEMC-004.png|650px]]</div> | ||
#Enter the command "'''fatls mmc 0:1'''" to view the contents of the sdcard fat partition. | #Enter the command "'''fatls mmc 0:1'''" to view the contents of the sdcard fat partition. | ||
| - | #:<div style="text-align:left;color:#4a4a4a;">[[Image: TSOM PTEEMC- | + | #:<div style="text-align:left;color:#4a4a4a;">[[Image: TSOM PTEEMC-005a.png|650px]]</div> |
| - | #Enter the command "'''fatload mmc 0:1 $loadaddr | + | #Enter the command "'''fatload mmc 0:1 $loadaddr tsom_emmc_500m_new.img'''" to load the .img file into the DDR3. |
| - | #:<div style="text-align:left;color:#4a4a4a;">[[Image: TSOM PTEEMC- | + | #:<div style="text-align:left;color:#4a4a4a;">[[Image: TSOM PTEEMC-006c.png|650px]]</div> |
#Switch SW1 to "OFF" position to switch to eMMC boot mode. | #Switch SW1 to "OFF" position to switch to eMMC boot mode. | ||
#:<div style="text-align:left;color:#4a4a4a;">[[Image: TSOM PTE revB-005.png|550px]]</div> | #:<div style="text-align:left;color:#4a4a4a;">[[Image: TSOM PTE revB-005.png|550px]]</div> | ||
#Enter the command "'''mmc rescan'''" to rescan the eMMC device. | #Enter the command "'''mmc rescan'''" to rescan the eMMC device. | ||
| - | #:<div style="text-align:left;color:#4a4a4a;">[[Image: TSOM PTEEMC- | + | #:<div style="text-align:left;color:#4a4a4a;">[[Image: TSOM PTEEMC-007a.png|650px]]</div> |
| - | #Enter the command "'''mmc write $loadaddr 0 | + | #Enter the command "'''mmc write $loadaddr 0 0xfa000'''" to program image file to the eMMC device. |
| - | #:<div style="text-align:left;color:#4a4a4a;">[[Image: TSOM PTEEMC- | + | #:<div style="text-align:left;color:#4a4a4a;">[[Image: TSOM PTEEMC-008a.png|650px]]</div> |
| - | #:Note: The number " | + | #:14. Note: The number "0xfa000" represents the image size, the unit is "block", each block has 512 bytes size. The size of the image file here is 524,288,000 bytes , i.e. 524,288,000/ 512=1,024,000 (block) . 1,024,000 converted to hexadecimal is 0xfa000. |
#Press the COLD_RST button of the TSoM evaluation kit to reboot the board into linux. When the "login in" message appears that shows the programming eMMC success. | #Press the COLD_RST button of the TSoM evaluation kit to reboot the board into linux. When the "login in" message appears that shows the programming eMMC success. | ||
| - | #:<div style="text-align:left;color:#4a4a4a;">[[Image: TSOM PTEEMC- | + | #:<div style="text-align:left;color:#4a4a4a;">[[Image: TSOM PTEEMC-009a.png|650px]]</div> |
= <span style="color:#000080;">1.2 Update Device Tree and zImage in the eMMC</span> = | = <span style="color:#000080;">1.2 Update Device Tree and zImage in the eMMC</span> = | ||
Latest revision as of 11:39, 14 November 2024
This guide will show you how to program the Linux image into the eMMC device on the TSoM module and explain how to update device tree and zImage in the eMMC device.
1.1 Re-flash linux image to emmc memory
- Prepare a SD card reader and a Micro SD card (minimum 4GB capacity,for Linux boot).
- Download the image file form the link below and unzip it, then use the tool such as "Win32 Disk Imager" or “Rufus” to write the linux image file(tsom_linux_mp.img) into the Mircro SD card.
- Insert the Micro SD card into the TSoM evaluation kit.
- Make sure SW2 is set to FPPx32 mode(See the picture below), so the FPGA can be configured by HPS. The factory default mode is the FPPx32 mode.
- Make sure that SW1 on the TSoM is switch to the "ON" position, which represents the HPS boot from the SD Card.
- Connect the PC and TSoM evaluation kit via mini USB cable and connect the Power adapter to power on the board.
- Use the terminal emulation program such as Putty on the operating system to connect to Linux running on TSoM
- .
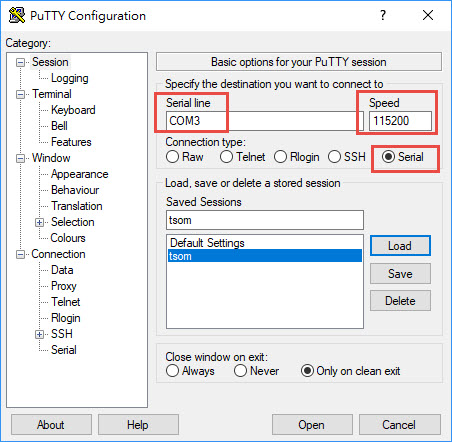
- Press the CPU KEY1(WARM_RST) button on the TSoM module and wait for the "Hit any key to stop autoboot :5" to appear in the Putty window. Press any key to enter uboot.
- Enter the command "fatls mmc 0:1" to view the contents of the sdcard fat partition.
- Enter the command "fatload mmc 0:1 $loadaddr tsom_emmc_500m_new.img" to load the .img file into the DDR3.
- Switch SW1 to "OFF" position to switch to eMMC boot mode.
- Enter the command "mmc rescan" to rescan the eMMC device.
- Enter the command "mmc write $loadaddr 0 0xfa000" to program image file to the eMMC device.
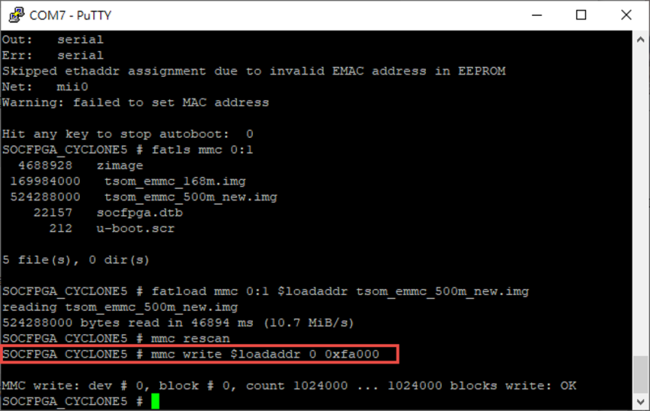
- 14. Note: The number "0xfa000" represents the image size, the unit is "block", each block has 512 bytes size. The size of the image file here is 524,288,000 bytes , i.e. 524,288,000/ 512=1,024,000 (block) . 1,024,000 converted to hexadecimal is 0xfa000.
- Press the COLD_RST button of the TSoM evaluation kit to reboot the board into linux. When the "login in" message appears that shows the programming eMMC success.


1.2 Update Device Tree and zImage in the eMMC
- Before you update files to the eMMC, you should make sure the Tsom board can boot from eMMC correctly.
- Copy your new device tree file(.dtb) and zImage files to USB flash drive.
- Insert the USB flash drive to TSoM Board with USB OTG cable, then boot linux from eMMC
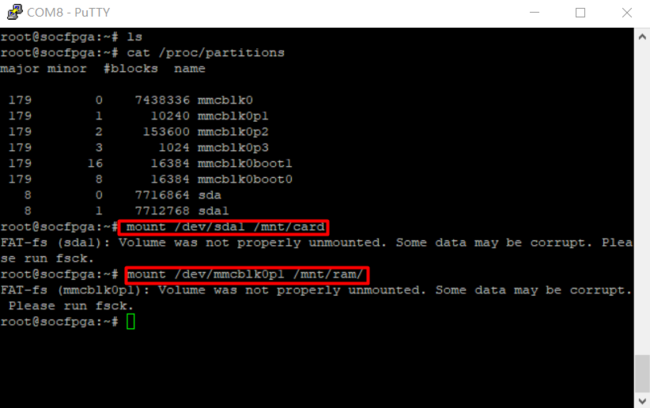
- After the linux is boot, enter "root" to login the system, then, mount the USB flash drive and eMMC memory's partition one to linux. Commands: "mount /dev/sda1 /mnt/card" and "mount /dev/mmcblk0p1 /mnt/ram/".
- (sda is USB flash drive, mmcblk0p1 is emmc memory's partition one; ignore the information when you do mount)
- Copy your new files from the USB flash drive to the eMMC memory with commands "cp /mnt/card/zImage /mnt/ram/zImage -rf" and "cp /mnt/card/soc_system.dtb /mnt/ram/soc_system.dtb -rf".
- Umount USB flash drive(command:"umount /mnt/ram" ) and eMMC memory's partition one(command:"umount/mnt/car").
- Press the COLD_RST button to reboot TSoM board, then it will boot linux with your new updated files.


