TSoM eMMC Programming Guide
From Terasic Wiki
(Difference between revisions)
(→1.1 Re-flash linux image to emmc memory) |
(→1.1 Re-flash linux image to emmc memory) |
||
| Line 16: | Line 16: | ||
#:<div style="text-align:left;color:#4a4a4a;">[[Image: TSOM PTE-021.jpg|650px]]</div> | #:<div style="text-align:left;color:#4a4a4a;">[[Image: TSOM PTE-021.jpg|650px]]</div> | ||
#Make sure that SW1 on the TSoM is cut to the Off position, which represents the HPS boot from the SD Card. | #Make sure that SW1 on the TSoM is cut to the Off position, which represents the HPS boot from the SD Card. | ||
| - | #:<div style="text-align:left;color:#4a4a4a;">[[Image: TSOM PTEEMC-002.jpg| | + | #:<div style="text-align:left;color:#4a4a4a;">[[Image: TSOM PTEEMC-002.jpg|550px]]</div> |
[[TSoM_Document|Back]] | [[TSoM_Document|Back]] | ||
Revision as of 18:00, 16 May 2019
This guide will show you how to program the Linux image into the eMMC device on the TSoM module and explain how to update device tree and zImage in the eMMC device.
1.1 Re-flash linux image to emmc memory
- Prepare a Micro SD card (minimum 4GB capacity) for Linux boot.
- Download the image file form the link below and use the tool such as "Win32 Disk Imager" to write the linux image file(tsom_linux_console.zip) into the Mircro SD card.
- Download the eMMC image file from the link below and extract it, then copy the image file(tsom_emmc_168M.img) to the fat partition of sdcard
- Make sure MSEL[4:0] is set to FPPx32 mode, so the FPGA can be configured by HPS.
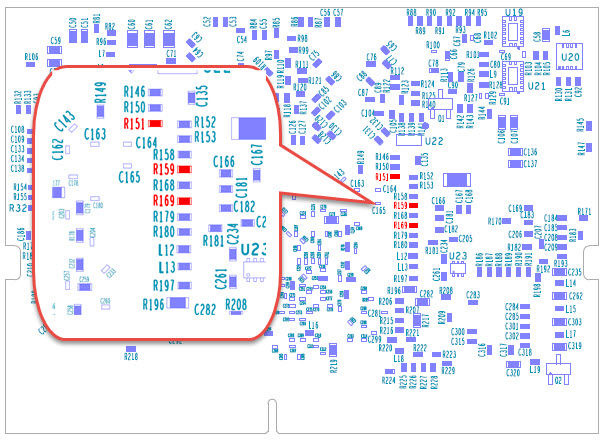
- Please install the 1K ohm resistors in the red resistor position in the figure below.
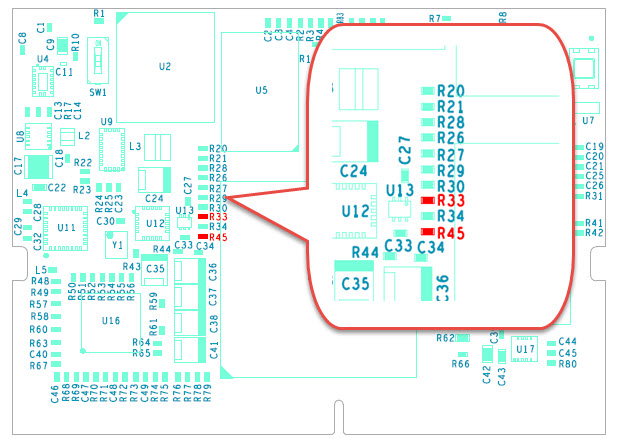
- Confirm that the red resistor position in the figure below DOES NOT have any resistors installed.
- Make sure that SW1 on the TSoM is cut to the Off position, which represents the HPS boot from the SD Card.


