DE10 Advance revC demo: Fan Speed Control
From Terasic Wiki
This demo helps users quickly understand how to set the MAX6650 chip from the FPGA to control the fansink. The MAX6650 chip can set or retrieve the RPM of the fansink. It can also monitor if there is any unexpected error and determine which type of error it is. The following section will save lots of time for the development of user application.
System Block Diagram
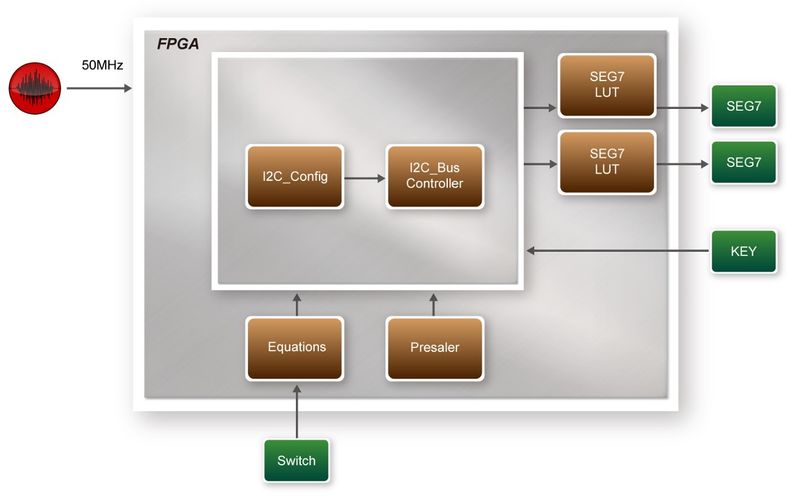
Figure 2-1 shows the system block diagram of this demo. It is necessary to configure the MAX6650 chip prior upon the initialization of fansink control. The MAX6650 chip uses standard I2C protocol for communication. The functions I2C_Config and I2C_Bus_Controller set and monitor the RPM of the fansink, respectively. A pre-scaler is used as frequency divider for the clock frequency of I2C. Users need to calculate the frequency based on the equations from the datasheet to control the RPM of the fansink. There are three equations in the datasheet and this demo uses one of them. For other equations, please refer to the datasheet MAX6650-MAX6651.pdf in the system CD.
The Switch[1] controls the RPM in this demo. When the Switch[1] is set to 0, the speed is around 2000 RPM. The speed would reach about 5000 RPM if the Switch[1] is set to 1. It would take 10 ~ 30 secs as the buffer time for the conversion.
- Figure 2-1 Block diagram of the Nios II Basic Demonstration
HEX and Switch States Assignments
When the fan is run, the HEX will display fan speed. And user can change the speed by SW.Users can refer to Table 5-4 and get a better understanding about the state of the fansink accordingly. Table 5-4 HEX and Switch States Assignments
