DE10-Advanced revC demo: PCI Express Software Stack Linux
From Terasic Wiki
(Difference between revisions)
(→Install PCI Express Driver on Linux) |
(→Install PCI Express Driver on Linux) |
||
| Line 24: | Line 24: | ||
# Plug the PCIe adapter card into the PCIe slot on the PC motherboard. Use the PCIe cable to connect to the DE10-Advanced PCIE connector and the PCIe adapter card (See [[#Figure83|Figure 1-2]]) | # Plug the PCIe adapter card into the PCIe slot on the PC motherboard. Use the PCIe cable to connect to the DE10-Advanced PCIE connector and the PCIe adapter card (See [[#Figure83|Figure 1-2]]) | ||
#: | #: | ||
| - | #:[[Image: DE10-Advanced_revC_PCIE_pic_32.jpg| | + | #:[[Image: DE10-Advanced_revC_PCIE_pic_32.jpg|700px]] |
#:::::'''Figure 1-2 FPGA board connect to PC''' | #:::::'''Figure 1-2 FPGA board connect to PC''' | ||
# Power on your DE10-Advanced board and the host PC | # Power on your DE10-Advanced board and the host PC | ||
| Line 40: | Line 40: | ||
#: *dmesg | tail -n 15 | #: *dmesg | tail -n 15 | ||
#: | #: | ||
| - | #:[[Image: DE10-Advanced_revC_PCIE_pic_33. | + | #:[[Image: DE10-Advanced_revC_PCIE_pic_33.png|500px]] |
#:::::'''Figure 8-4 Screenshot of install PCIe driver'''</div> | #:::::'''Figure 8-4 Screenshot of install PCIe driver'''</div> | ||
Revision as of 18:44, 27 August 2018
Figure 1-1 shows the software stack for the PCI Express application software on 64-bit Linux. The PCIe library module terasic_pcie_qys.so provides DMA and direct I/O access for user application program to communicate with FPGA. Users can develop their applications based on this .so library file. The altera_pcie.ko kernel driver is provided by Altera.

- Figure 8-2 PCI Express Software Stack
Install PCI Express Driver on Linux
To make sure the PCIe driver can meet your kernel of Linux distribution, the driver altera_pcie.ko should be recompile before use it. The PCIe driver project is locate in the folder:CDROM/Demonstrations/PCIe_SW_KIT/Linux/PCIe_Driver
The folder includes the following files:
- altera_pcie.c
- altera_pcie.h
- altera_pcie_cmd.h
- Makefile
- load_driver
- unload
- config_file
To compile and install the PCI Express driver, please execute the steps below:
- Make sure the DE10-Advanced and the PC are both powered off.
- Plug the PCIe adapter card into the PCIe slot on the PC motherboard. Use the PCIe cable to connect to the DE10-Advanced PCIE connector and the PCIe adapter card (See Figure 1-2)
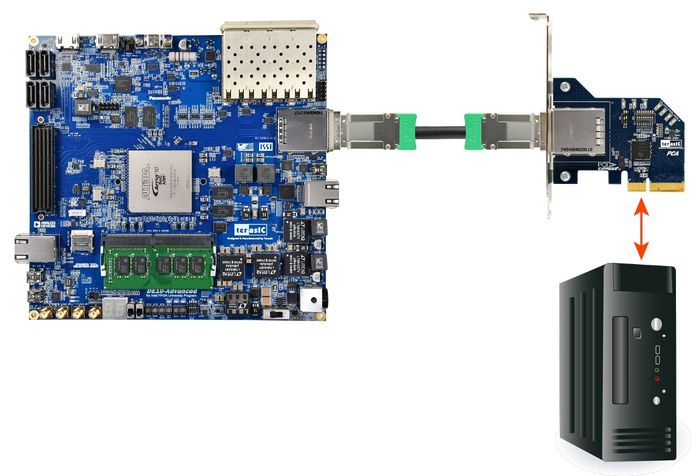
- Figure 1-2 FPGA board connect to PC
- Power on your DE10-Advanced board and the host PC
- Open a terminal and use "cd" command to goto the folder"CDROM/Demonstrations/PCIe_Fundamental/demo_batch".
- Set QUARTUS_ROOTDIR variable pointing to the Quartus installation path. Set QUARTUS_ROOTDIR variable by tying the following commands in terminal. Replace “/home/centos/intelFPGA/18.0/quartus” to your quartus installation path.
- export QUARTUS_ROOTDIR=/home/centos/intelFPGA/18.0/quartus
- Execute "sudo -E sh test.sh" command to configure the FPGA
- Restart Linux operation system. In Linux, open a terminal and use “cd” command to goto the PCIe_Driver folder
- Type the following commands to compile and install the driver altera_pcie.ko, and make sure driver is loaded successfully and FPGA is detected by the driver as shown in Figure 8-4.
- *make
- *sudo sh load_driver
- *dmesg | tail -n 15
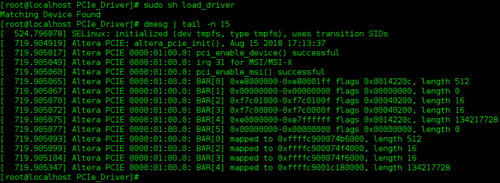
- Figure 8-4 Screenshot of install PCIe driver</div>


Create a Software Application
All the files needed to create a PCIe software application are located in the directory CDROM/Demonstrations/PCIe_SW_KIT/Linux/PCIe_Library. It includes the following files:
* TERASIC_PCIE_AVMM.h
- terasic_pcie_qsys.so (64-bit library)
Below lists the procedures to use the library in users’ C/C++ project:
# Create a 64-bit C/C++ project.
- Include TERASIC_PCIE_AVMM.h in the C/C++ project.
- Copy terasic_pcie_qsys.so to the folder where the project execution file is located.
- Dynamically load terasic_pcie_qsys.so in C/C++ program. To load the terasic_pcie_qsys.so, please refer to the PCIe fundamental example below.
- Call the library API to implement the desired application.
Users can easily communicate with the FPGA through the PCIe bus through the terasic_pcie_qsys.so API. The details of API are described below: