BAL Battery Case 01 Battery Installation Guide
From Terasic Wiki
Contents |
Chpater1 Install Lithium Battery
The Self-Balancing Robot’s main power source is a lithium battery pack with three 12 V series 18650 batteries. For safety reasons, the lithium batterie are not included in the development kit. Users need to purchase three 18650 3.7V Lithium-Ion battery for the robot. The following linked products can be used as a reference for purchase:
https://www.digikey.com/product-detail/en/sparkfun-electronics/PRT-12895/1568-1488-ND/5271298
Note that only the 18650 batteries with a length of 65 mm can be installed in the battery case on the robot. Do not purchase batteries longer than this length, otherwise they will not fit into the battery case.

Next, please open the balance car's kit packaging, remove the robot. Remove the lithium battery case from the Self-Balancing Robot, install the battery and reload it into the car.
Detailed steps are as follows:
1-1 Remove the lithium battery case
- Remove the package box from the robot,
- Release the Velcro, take the strap off of the lithium battery case.
- The Battery case parts distribution is shown below after removing the battery case.


1-2 Install the batteries into the lithium battery case
- The purpose of the lithium battery case is to prevent the lithium battery from exceed the safety value while charging; at the same time, it also protects the battery from damage in case the voltage is too low. When first opening the balance car package, the lithium batteries are not in the battery case. The users need to install the three 18650 lithium battery into the battery case.
- The battery compartment has a slot design. The black cover will secure the white battery holder.
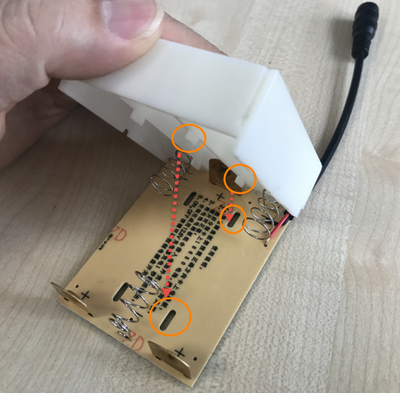
- We suggest users open the battery case with both hands. First, locate the little slots on the left and right sides of the battery case. Second, slightly push the cover outward to take it out of #:the battery compartment.
- Use the left and right middle fingers to slightly push the center tabs out.
- Next, use both thumbs to push the white battery compartment forward, and then the battery case should be opened. The battery cover and compartment can be connected tightly; therefore, users might need to use more strength.
- Remove the battery compartment.
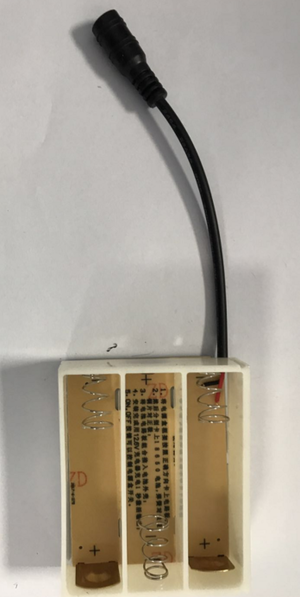
- The battery case contains two parts: the battery cover and a PCB board. If it becomes lose, you can follow the picture below to put it back together.
- Prepare three 18650 lithium batteries and follow the instructions to insert the batteries positive and negative sides accordingly.

- The positive and negative battery installation and distribution are as follows:
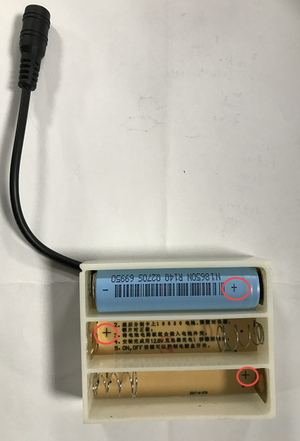
- Note, in the slot with the power cord the battery will not go in as easily due to the wire connection, be sure to push harder on the battery to ensure that is goes into the slot.

- After the batteries are inserted, please double check the batteries positive and negative polarity on each battery are positioned correctly.
- Make sure the back of the PCB has good bonding with the battery cover and can be closed smoothly.
- When replacing the battery cover, please make sure that the power cord has a notched position corresponding to the case. This allows the case to be reassembled without damaging the power cord or the case.
- Caution! Despite the charging status, batteries need to be connected to a charger due to the circuit design of the battery to activate the output voltage circuit. Otherwise, there will be no power output. The battery box needs to stay connected to the charger for at least 1 second. If there is no battery replacement, then users do not need to repeat this step.


1-3 Insert the lithium battery case back into the robot
- Once the battery case has been reassembled, follow the picture illustration below to place the battery case back into the robot. Please make sure to place the battery case in empty space in the middle of the robot, as indicated in the picture. This action will ensure that the wires are neatly placed in the proper location.
- Insert the blue Velcro strap (with the plush side up) between the battery and the robot.
- Pay attention to the power cord tied to the cable tie in the back of the car.
- To tighten and secure the lithium battery box and the body, tie Velcro from the bottom of the body back to the front body through the black ring.
- Tie the Velcro down to secure the battery case.
- Users can adjust the black ring to their desire spot. It’s the best to tie it securely to the body.
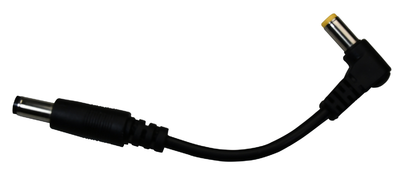
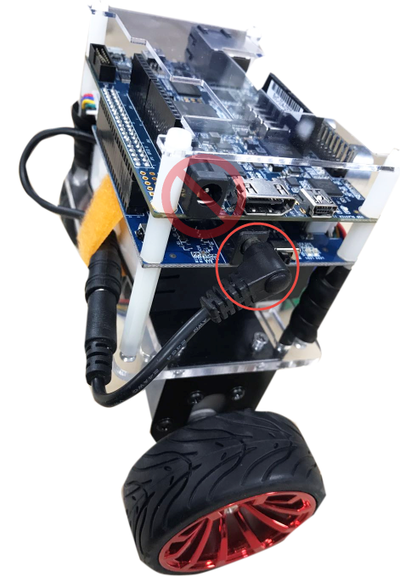
- Use the DC power cable (can be found in the Package Box) to connect the lithium battery case to robot’s power input.
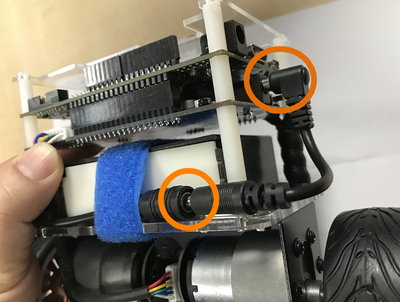
- Please note that do not plug the DC power cable into the DE10-Nano 5V power jack
- To test whether the battery has normal power supply or not, turn the system power switch to the right.
- If the power is normal, users will see the green LED lit up; the DE10-Nano blue power light will also be lit up.
- If the LEDs fail to be lit up:
- Please check if the DC power cable is connected properly.
- Every time the batteries are installed, please make sure the battery charger is attached to the battery box for at least one second to activate the battery power output.
- If there is still no power output after completing the two actions above, remove the battery case, and check the batteries to see if the positive and negative polarity of the batteries are installed correctly.
- If you are still having problems, please contact support@terasic.com for further assistance.


Chpater2 Install Battery of Remote Control
For safety reasons, the battery of the infrared remote control is not installed in the package. If the user needs to use the remote control, user needs to buy a CR2025 Lithium Button Cell (available at most electronic and drug stores).
The specifications of the battery are as follows: * Type :CR2025 Lithium Button Cell
- Voltag : 3V
- Diameter : 20mm
- Height: 25mm

Installation steps:
- Turn the infrared remote upside down and slide the battery tray out, as illustrated below.
- With the positive side facing up toward you, put in the CR2025 battery.
- Slide the battery tray back into the infrared remote until it clicks.


Chpater3 Additional Information
Getting Help
Contact us via the following methods for further technical assistance:
- Terasic Inc.9F, No.176, Sec.2, Gongdao 5th Rd, East Dist, Hsinchu City, Taiwan 300-70
- Email : support@terasic.com
- Web : www.terasic.com
Revision History
| Date | Version | Changes |
| 2018.03.16 | First publication | |