DE10 Advance revC demo: Low Latency Ethernet 10G MAC Demo
From Terasic Wiki
(Difference between revisions)
(→Project Information) |
(→Demonstration Setup) |
||
| (12 intermediate revisions not shown) | |||
| Line 29: | Line 29: | ||
Here is the procedure to setup the demonstration. A SFP+ loopback fixture is required for this demonstration. | Here is the procedure to setup the demonstration. A SFP+ loopback fixture is required for this demonstration. | ||
| - | + | ||
| - | + | #Insert a SFP+ loopback fixture into the SFP+-A port on the DE10-Advanced board as shown in Figure 1-2. | |
| - | + | #:[[File:DE10-Advanced revc demo qsfp loop.jpg|400px]] | |
| - | + | #:::'''Figure 1-2 SFP+-A loopback on the DE10-Advanced''' | |
| - | + | #Connect the host PC to the FPGA board using a Mini-USB cable. Please make sure the USB-Blaster II driver is installed on the host PC. <span style="color:#ff0000;">(也许可以和插SFP+的图一张,示意mini-USB位置)</span> | |
| - | + | #: | |
| - | + | #Power on the FPGA Board. | |
| - | + | #: | |
| - | + | #Execute the demo batch file “test.bat” under the batch file folder, alt_eth\demo_batch. | |
| - | + | #: | |
| + | #Launch the System Console by selecting the menu item “Tools=>System Debugging Tools=>System Console” in Quartus. | ||
| + | #: | ||
| + | #In the Tcl Console pane, type “cd hwtesting/system_console” to change directory to the folder: ./alt_eth/hwtesting/system_console as shown in Figure 1-3. | ||
| + | #: | ||
| + | #Type “source gen_conf.tcl” to generates and sends about 4 billion packets as shown in Figure 1-4. | ||
| + | #: | ||
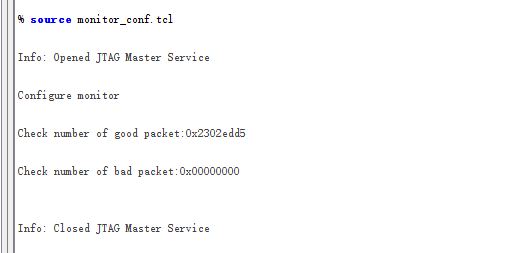
| + | #Type “source monitor_conf.tcl” to checks the number of good and bad packets received. as shown in Figure 1-5. | ||
| + | #: | ||
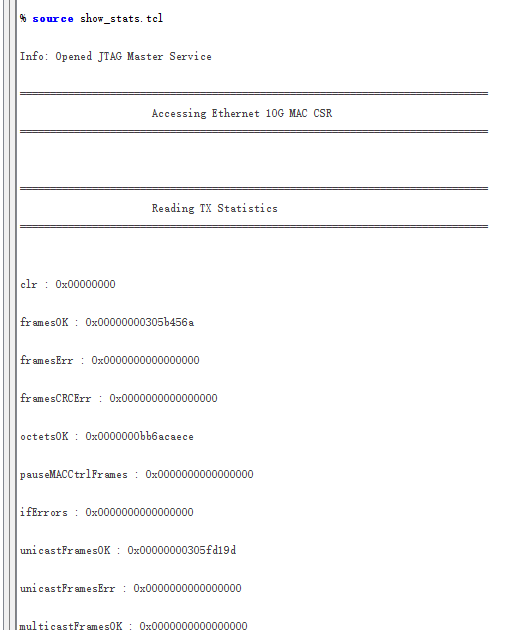
| + | #Type “source show_stats.tcl” to checks the number of good and bad packets received. as shown in Figure 1-6. | ||
| + | #: | ||
| + | #Wait 6 minutes to complete loopback task, then re-type “source monitor_conf.tcl” to see “0xffff2000” good packets. | ||
| + | #: | ||
| + | |||
| + | |||
| + | [[File:De10-advanced revc 10gbase System Console.png|900px]] | ||
| + | |||
| + | |||
| + | ::::::'''Figure 1-3 Launch the System Console for Ethernet 10GBASE-R Demo''' | ||
| + | |||
| - | + | :::::::[[File:De10-advanced revc 10gbase test message for gen conf.tcl.png|500px]] | |
| + | |||
| + | |||
| + | ::::::'''Figure 1-4 Ethernet 10BASE-R test message for gen_conf.tcl''' | ||
| + | |||
| - | Figure | + | :::::::[[File:De10-advanced revc 10gbase test message for monitor conf.tcl.png|540px]] |
| + | |||
| + | |||
| + | ::::::'''Figure 1-5 Ethernet 10BASE-R test message for monitor_conf.tcl''' | ||
| - | + | ||
| - | + | :::::::[[File:De10-advanced revc 10gbase test message for show stats.tcl.png|543px]] | |
| - | Figure | + | |
| + | ::::::'''Figure 1-6 Ethernet 10BASE-R test message for show_stats.tcl''' | ||
| + | |||
| + | '''[[DE10-Advance_Demonstration_Manual_revC#Chapter 2 Examples For FPGA|Back]]''' | ||
Latest revision as of 19:29, 29 August 2018
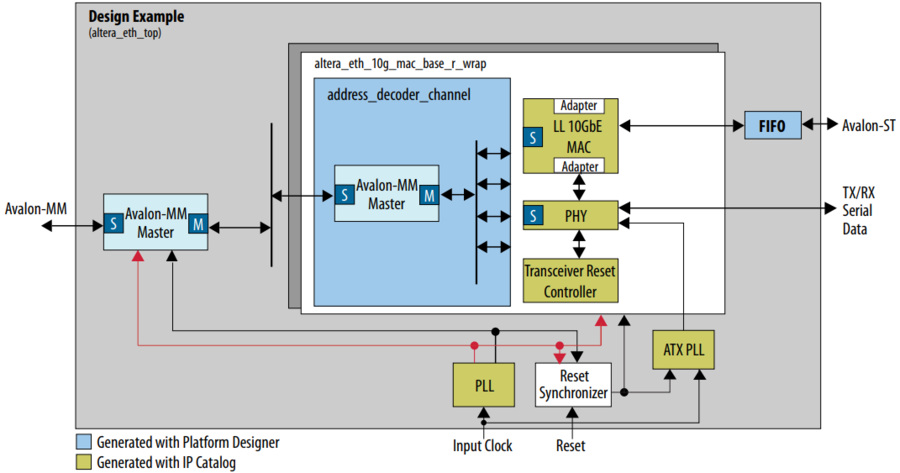
This 10GBASE-R Ethernet design example is generated according to the documents : Low Latency Ethernet 10G MAC Intel Arria 10 FPGA IP Design Example User Guide. The LL(Low Latency) 10GbE IP is used in the example design. This example executes the external loopback test through one of the SFP+ ports on the FPGA main board. A SFP+ loopback fixture is required to perform this demonstration. Figure 1-1 shows the block diagram of this demonstration.
- Figure 1-1 Block diagram of 10GBASE-R demo
Project Information
The Project information is shown in the table below.
Item Description Project Location CDROM/Demonstration/FPGA/alt_eth FPGA Bit Stream CDROM/Demonstration/FPGA/alt_eth/output_files/altera_eth_top.sof Test Scrip File CDROM/Demonstration/FPGA/alt_eth/hwtesting/system_console/ - gen_conf.tcl
- monitor_conf.tcl
- show_stats.tcl
Quartus Version Quartus Prime 18.0.0 Build 614 Standard Edition
Demonstration Setup
Here is the procedure to setup the demonstration. A SFP+ loopback fixture is required for this demonstration.
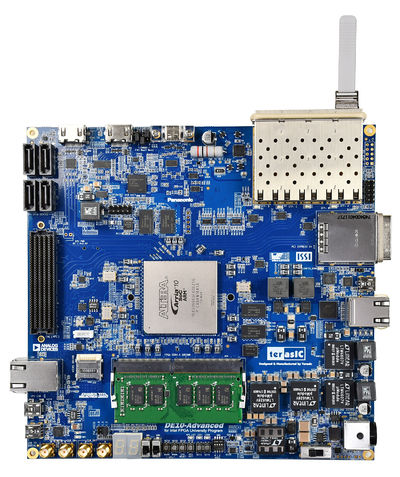
- Insert a SFP+ loopback fixture into the SFP+-A port on the DE10-Advanced board as shown in Figure 1-2.
- Connect the host PC to the FPGA board using a Mini-USB cable. Please make sure the USB-Blaster II driver is installed on the host PC. (也许可以和插SFP+的图一张,示意mini-USB位置)
- Power on the FPGA Board.
- Execute the demo batch file “test.bat” under the batch file folder, alt_eth\demo_batch.
- Launch the System Console by selecting the menu item “Tools=>System Debugging Tools=>System Console” in Quartus.
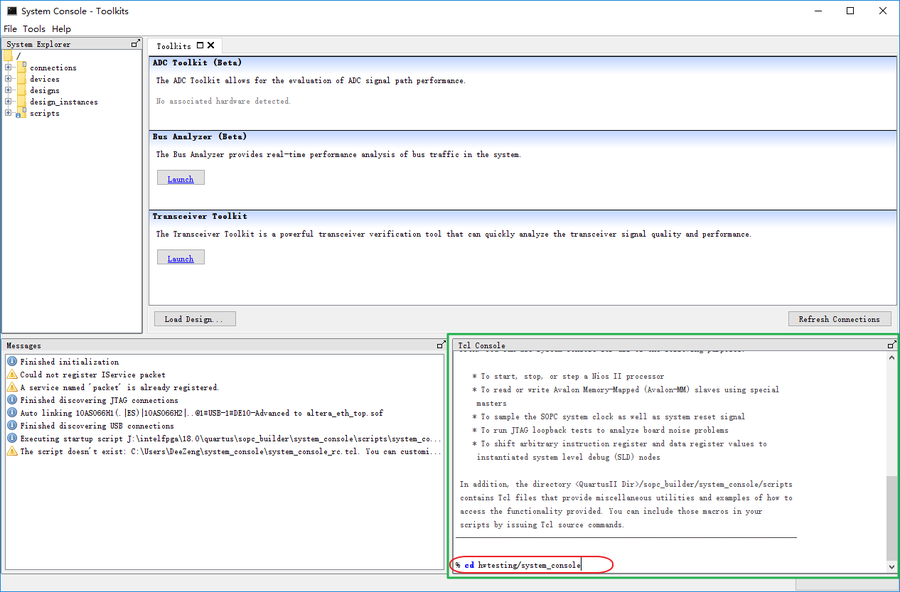
- In the Tcl Console pane, type “cd hwtesting/system_console” to change directory to the folder: ./alt_eth/hwtesting/system_console as shown in Figure 1-3.
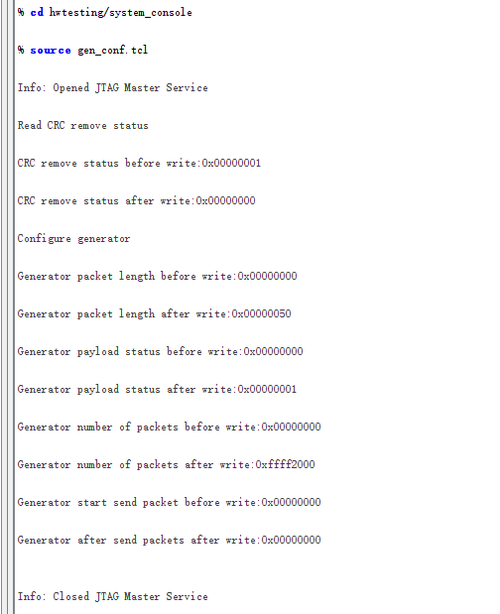
- Type “source gen_conf.tcl” to generates and sends about 4 billion packets as shown in Figure 1-4.
- Type “source monitor_conf.tcl” to checks the number of good and bad packets received. as shown in Figure 1-5.
- Type “source show_stats.tcl” to checks the number of good and bad packets received. as shown in Figure 1-6.
- Wait 6 minutes to complete loopback task, then re-type “source monitor_conf.tcl” to see “0xffff2000” good packets.
- Figure 1-3 Launch the System Console for Ethernet 10GBASE-R Demo
- Figure 1-4 Ethernet 10BASE-R test message for gen_conf.tcl
- Figure 1-5 Ethernet 10BASE-R test message for monitor_conf.tcl
- Figure 1-6 Ethernet 10BASE-R test message for show_stats.tcl
