DE10 Advance revC demo: Setup USB Wi-Fi Dongle
From Terasic Wiki
(→System Diagram) |
|||
| (One intermediate revision not shown) | |||
| Line 2: | Line 2: | ||
=System Diagram= | =System Diagram= | ||
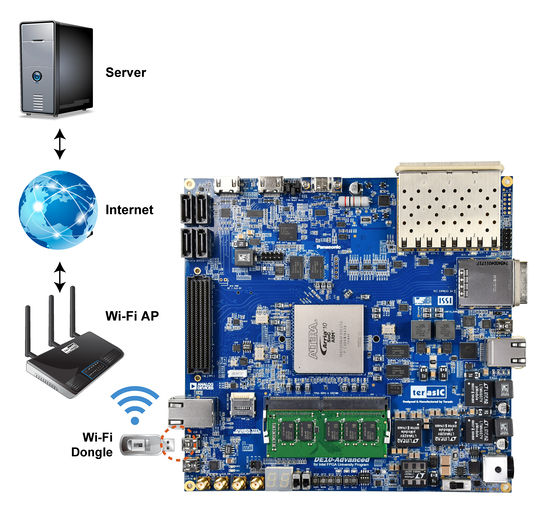
Figure 3-6 shows the block diagram of this demonstration. The Wi-Fi AP assumes you have the DHCP server capability and is connected to the LAN (Local Area Network) or the internet. The USB Wi-Fi Dongle connects to the Wi-Fi AP and gets an address IP from the Wi-Fi AP. Through the Wi-Fi AP, the USB-Dongle will be able to communicate with the devices connected to the LAN or the internet. | Figure 3-6 shows the block diagram of this demonstration. The Wi-Fi AP assumes you have the DHCP server capability and is connected to the LAN (Local Area Network) or the internet. The USB Wi-Fi Dongle connects to the Wi-Fi AP and gets an address IP from the Wi-Fi AP. Through the Wi-Fi AP, the USB-Dongle will be able to communicate with the devices connected to the LAN or the internet. | ||
| - | + | ::[[File:System diagram of USB Wi-Fi dongle.jpg|550px]] | |
:::::::Figure 3-6 System diagram of USB Wi-Fi dongle | :::::::Figure 3-6 System diagram of USB Wi-Fi dongle | ||
=Wi-Fi Setup Procedure= | =Wi-Fi Setup Procedure= | ||
| - | *Connect a USB cable to the USB-to-UART connector (J27) on the DE10-Advanced board and the host PC. | + | :*Connect a USB cable to the USB-to-UART connector (J27) on the DE10-Advanced board and the host PC. |
| - | *Connedt the USB Wi-Fi Dongle into the USB port on the DE10-Advanced with USB Transfer Cable. | + | :*Connedt the USB Wi-Fi Dongle into the USB port on the DE10-Advanced with USB Transfer Cable. |
| - | *Power on the DE10-Advanced board. | + | :*Power on the DE10-Advanced board. |
| - | *Launch Putty to establish the connection between the UART port of the DE10-Advanced board and the host PC. Type "root" and then press "Enter." By pressing "Enter," you can login to Linux without password. | + | :*Launch Putty to establish the connection between the UART port of the DE10-Advanced board and the host PC. Type "root" and then press "Enter." By pressing "Enter," you can login to Linux without password. |
| - | *Type "ifconfig wlan0 up" in the UART terminal of Putty to start wlan0 network interface. | + | :*Type "'''ifconfig wlan0 up'''" in the UART terminal of Putty to start wlan0 network interface. |
| - | *Type "iwlist wlan0 scan | grep ESSID" in the UART terminal to search nearby Wi-Fi AP. Make sure your Wi-Fi AP is found. | + | :*Type "'''iwlist wlan0 scan | grep ESSID'''" in the UART terminal to search nearby Wi-Fi AP. Make sure your Wi-Fi AP is found. |
| - | :[[File:Iwlist wlan0 scan grep ESSID.jpg|500px]] | + | ::[[File:Iwlist wlan0 scan grep ESSID.jpg|500px]] |
| - | *Type "vim /etc/wpa_supplicant/wpa_supplicant.conf" in the UART terminal to edit Wi-Fi configuration file. | + | :*Type "'''vim /etc/wpa_supplicant/wpa_supplicant.conf'''" in the UART terminal to edit Wi-Fi configuration file. |
| - | :[[File:Wpa supplicant.jpg|400px]] | + | ::[[File:Wpa supplicant.jpg|400px]] |
| - | *In the configuration file, replace "Your_SSID" and "Your_WPA-Key_ASCII" with the SSID and password for your Wi-Fi AP, in respectively. | + | :*In the configuration file, replace "Your_SSID" and "Your_WPA-Key_ASCII" with the SSID and password for your Wi-Fi AP, in respectively. |
| - | :[[File:Your SSID.jpg|400px]] | + | ::[[File:Your SSID.jpg|400px]] |
| - | *Type "ifup wlan0" in the UART terminal to connect to the Wi-Fi AP. | + | :*Type "'''ifup wlan0'''" in the UART terminal to connect to the Wi-Fi AP. |
| - | :[[File:Ifup wlan0.jpg|500px]] | + | ::[[File:Ifup wlan0.jpg|500px]] |
| - | *Type "ifconfig wlan0" in the UART terminal to confirm an IP Address is assigned to wlan0 interface. | + | :*Type "'''ifconfig wlan0'''" in the UART terminal to confirm an IP Address is assigned to wlan0 interface. |
| - | :[[File:Ifconfig wlan0.jpg|500px]] | + | ::[[File:Ifconfig wlan0.jpg|500px]] |
| - | *Make sure Wi-Fi AP is connected to the internet. Type "ping -c 4 www.terasic.com" in the UART terminal to check internet connection status. If 0% packet loss is reported, it means the connection is good. | + | :*Make sure Wi-Fi AP is connected to the internet. Type "'''ping -c 4 www.terasic.com'''" in the UART terminal to check internet connection status. If 0% packet loss is reported, it means the connection is good. |
| - | :[[File:Ping c 4.jpg|600px]] | + | ::[[File:Ping c 4.jpg|600px]] |
'''[[DE10-Advance_Demonstration_Manual_revC#Chapter 3 Examples for HPS SoC|Back]]''' | '''[[DE10-Advance_Demonstration_Manual_revC#Chapter 3 Examples for HPS SoC|Back]]''' | ||
Latest revision as of 16:46, 31 August 2018
This section describes how to setup the Wi-Fi USB dongle under Linux, so Linux user can wirelessly connect to the Wi-Fi AP (Access Point) through the Wi-Fi USB Dongle and finally connect to the internet. The Wi-Fi AP is assumed to have the DHCP server capability and is connected to the internet. You should also make sure you know the SSID and Password of the Wi-Fi AP.
System Diagram
Figure 3-6 shows the block diagram of this demonstration. The Wi-Fi AP assumes you have the DHCP server capability and is connected to the LAN (Local Area Network) or the internet. The USB Wi-Fi Dongle connects to the Wi-Fi AP and gets an address IP from the Wi-Fi AP. Through the Wi-Fi AP, the USB-Dongle will be able to communicate with the devices connected to the LAN or the internet.
Wi-Fi Setup Procedure
- Connect a USB cable to the USB-to-UART connector (J27) on the DE10-Advanced board and the host PC.
- Connedt the USB Wi-Fi Dongle into the USB port on the DE10-Advanced with USB Transfer Cable.
- Power on the DE10-Advanced board.
- Launch Putty to establish the connection between the UART port of the DE10-Advanced board and the host PC. Type "root" and then press "Enter." By pressing "Enter," you can login to Linux without password.
- Type "ifconfig wlan0 up" in the UART terminal of Putty to start wlan0 network interface.
- Type "iwlist wlan0 scan | grep ESSID" in the UART terminal to search nearby Wi-Fi AP. Make sure your Wi-Fi AP is found.
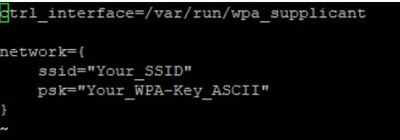
- Type "vim /etc/wpa_supplicant/wpa_supplicant.conf" in the UART terminal to edit Wi-Fi configuration file.
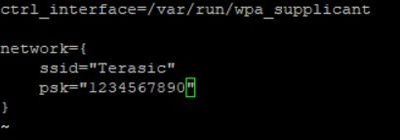
- In the configuration file, replace "Your_SSID" and "Your_WPA-Key_ASCII" with the SSID and password for your Wi-Fi AP, in respectively.
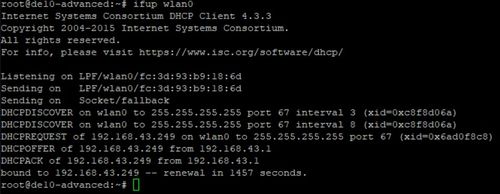
- Type "ifup wlan0" in the UART terminal to connect to the Wi-Fi AP.
- Type "ifconfig wlan0" in the UART terminal to confirm an IP Address is assigned to wlan0 interface.
- Make sure Wi-Fi AP is connected to the internet. Type "ping -c 4 www.terasic.com" in the UART terminal to check internet connection status. If 0% packet loss is reported, it means the connection is good.


