DE10 Advance revC demo: Network Socket
From Terasic Wiki
This demonstration shows how two remote application processes communication via socket in client-server model. Based on this design example,developers can make their Linux Application Software, run on SoC FPGA boards and easily communicate with other hosts via a network socket.
Contents |
Sockets
Sockets are the fundamental technology for programming software to communicate on the transport layer of networks shown in Figure 3-11. A socket provides a bidirectional communication endpoint for sending and receiving data with another socket. Socket connections normally run between two different computers on a LAN, or across the Internet, but they can also be used for interprocess communication on a single computer.
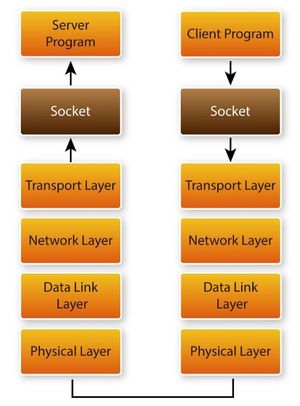
- Figure 3-11 Communicate on a network via a socket

Client Server Model
Most interprocess’s communication uses the client server model. These terms refer to the two processes which will be communicating with each other. One of the two processes, the client, connects to the other process, the server typically to makes a request for information. A good analogy is a person who makes a phone call to another person.
Notice that the client needs to know of the existence of and the address of the server, but the server does not need to know the address of (or even the existence of) the client prior to the connection being established.
Notice also that once a connection is established, both sides can send and receive information.
The system calls for establishing a connection which is somewhat different for the client and the server, but both involve the basic construct of a socket. A socket is one end of an interprocess communication channel. The two processes each establish their own socket. Figure 3-12 shows the communication diagram between the client and server.
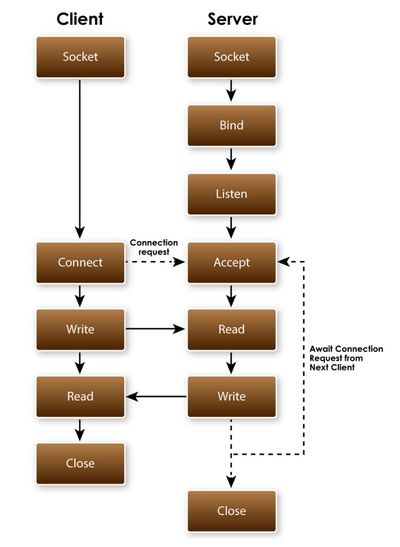
- Figure 3-12 Client and Server communication

The steps involved in establishing a socket on the client side are as follows:
- Create a socket with the socket() system call
- Connect the socket to the address of the server using the connect() system call
- Send and receive data. There are a number of ways to do this, but the simplest is to use the read() and write() system calls.
The steps involved in establishing a socket on the server side are as follows:
- Create a socket with the socket() system call
- Bind the socket to an address using the bind() system call. For a server socket on the Internet, an address consists of a port number on the host machine.
- Listen for connections with the listen() system call
- Accept a connection with the accept() system call. This call typically blocks until a client connects with the server.
- Send and receive data. There are a number of ways to do this, but the simplest is to use the read() and write() system calls.
Example Code Explanation
The example design contains two projects. One is socket server project, and one is socket client project. The SOCK_STREAM socket type is used in the design. The Linux Socket Library is used to provide socket functions, so remember to include the socket API header file – socket.h.
The major function of socket server program is to create a socket server based on the given port number and waiting a client to request to establish a connection. When a connection is established, the server is waiting for an incoming text message. When a message is received, it will show the receiver message on the console terminal, then send the message “I got your message” to the client socket, and then close the server program. Figure 3-13 shows the socket relative code statement. In the program, socket API is used to create a SOCK_STREAM socket, bind API is used to bind the socket to any incoming address and a specified port number. For connection, listen API is used to make the socket as a passive socket that is, as a socket that will be used to accept the incoming connection, and accept API is used to accept the incoming connection. The accept blocks until a client connects with the server. Data receiving and sending is implemented by the read and write API, and close is used to close the socket.
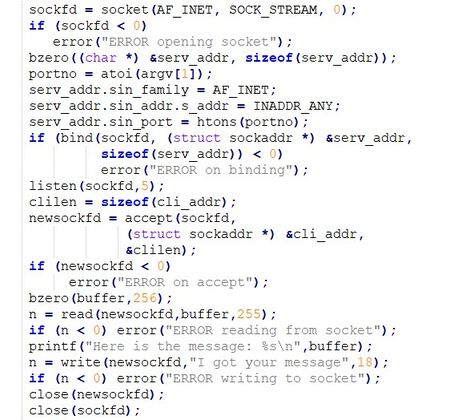
- Figure 3-13 Socket Server Code

The major function of the socket client program is to create a connection based on given hostname (or IP address) and host port. When a connection is established, it will show “Please enter the message: ” message on console terminal to ask users to input a message. After get user’s input message, the message is sent to a remote socket server via the socket. If the remote server socket received the message, it will return a message “I got the message”. The client program will show the received message on the console terminal and exit the program. Figure 3-14 shows the socket relative code statement. In the program, socket API is used to create a SOCK_STREAM socket, connect API is used to connect the remove socket sever based on the given hostname (or IP4v Address) and port number. Data receiving and sending is implemented by read and write API, and close is used to close the socket.
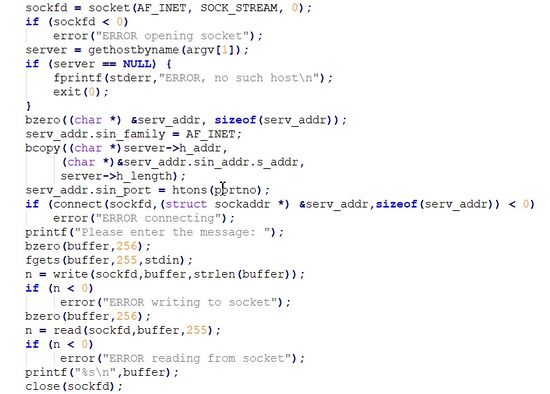
- Figure 3-14 Socket Client Code

Demonstration Source Code
The source code of the design example is located in the Demonstration folder asshown in Figure 3-15. The Demonstration folder contains three platform subfolders: arm, linux and windows. The project under the arm folder is designed for SoC FPGA board. The project under linux folder is designed for Linux running on Linux PC. The project under windows folder is designed for SoC EDS Shell running on Windows PC. Each platform subfolder contains socket_client and socket_server project folders.
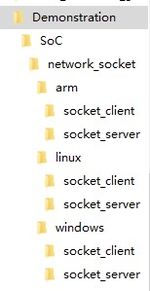
- Figure 3-15 Source Code Folder Tree

The socket_client project includes a Makefile and a source file main.c. For different platforms, the Makefile content is different, but the main.c content is the same. The socket_server project has the file project architecture.
Demonstration Setup
Here we show the procedure to execute the socket client-server communication demonstration. In this setup procedure, the server program is running to Intel SoC FPGA board and the Socket Client is running on Windows PC.
- Connect the DE10-Advanced board to Network via Ethernet port (J25).
- Connect a USB cable to the USB-to-UART connector (J27) on the DE10-Advanced board and the host Windows PC.
- Copy the executable file “socket_server” into the microSD card under the "/home/root" folder in Linux. (DE10-Advanced LXDE has pre-installed this code, so users can skip this copy action.)
- Insert the LXDE booting micro SD card into the DE10-Advanced board.
- Power on the DE10-Advanced board.
- In Windows, launch the Putty to connect DE10-Advanced via the UART-to-USB port.
- In the Putty, type "root" to login LXDE Linux.
- Type " ./socket_server 2020" to launch the server program with port number 2020 as shown in Figure 3-16. The port number can be any value between 2000 and 63500.

- Figure 3-16 Start Socket Server
Here is the procedure to start the socket client program and communicate with the client server program:
- Make sure the SoC EDS is installed on your Windows and the Windows is connected to a network.
- Copy the client program (windows/socket_client/socket_client.exe) in the example kit to your Windows.
- Launch the SoC EDS Command Shell.
- In the command shell, change the current directory to the directory where socket_client.exe is located.
- Then, type “./socket_client <ip address> 2020” to launch the client program to connect to the host server with port number 2020 as shown in Figure 3-17.

- Figure 3-17 Start Client Program
- If connection is established successfully, a prompt message “Please enter the message.” will appear. Type “hello”, then an echo message “I got your message” will be sent from the client server and shown on terminal as shown in Figure 3-18. At the same time, the socket server program will dump the received message at which point it is terminated as shown in Figure 3-19.

- Figure 3-18 Send Message in Client Program


- Figure 3-19 Server dumps received message
