DE10 Advance revC demo: HDMI TX and RX in 4K Resolution
From Terasic Wiki
(→Hardware Requirement) |
(→Demonstration Setup) |
||
| (21 intermediate revisions not shown) | |||
| Line 1: | Line 1: | ||
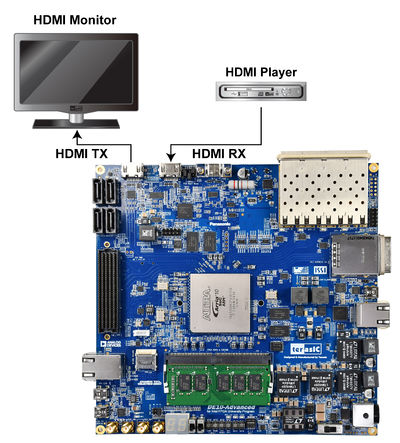
This demonstration uses the Intel® FPGA HDMI IP core to implement the HDMI Retransmit function in the FPGA of the DE10-Advanced. As shown in Figure 1-1, User can connect an HDMI video player to the to input video and audio data to HDMI RX port of the DE10-Advanced. After the HDMI video data is received in the FPGA, it will be instantly transferred to the HDMI TX port. The user only needs to connect an HDMI screen to the DE10-advaned. User only needs to connect an HDMI screen to the DE10-advanced, then you can watch the images output by the HDMI Player. This demonstration supports image resolution up to 4K60P. If you want to learn HDMI high-performance related image processing, this demo can help you learn quickly. | This demonstration uses the Intel® FPGA HDMI IP core to implement the HDMI Retransmit function in the FPGA of the DE10-Advanced. As shown in Figure 1-1, User can connect an HDMI video player to the to input video and audio data to HDMI RX port of the DE10-Advanced. After the HDMI video data is received in the FPGA, it will be instantly transferred to the HDMI TX port. The user only needs to connect an HDMI screen to the DE10-advaned. User only needs to connect an HDMI screen to the DE10-advanced, then you can watch the images output by the HDMI Player. This demonstration supports image resolution up to 4K60P. If you want to learn HDMI high-performance related image processing, this demo can help you learn quickly. | ||
| + | |||
| + | [[File:DE10-Advanced revc demo hdmi tx rx 4k 1-1.jpg|500px]] | ||
| + | :::::'''Figure 1-1 The Architecture of the demonstration''' | ||
=System Block Diagram= | =System Block Diagram= | ||
Figure 1-2 shows the system block diagram of this example. It shows that the Intel® FPGA HDMI IP core is used in the FPGA. It is divided into two parts: Transmitter and Receiver. These two IPs can be directly used by Transition-minimized differential signaling (TMDS) interface connection, only need HDMI repeater or redrive IC as an intermediary to connect HDMI devices, no need to use special HDMI Transmitter and Receiver IC. For details about HDMI IP, please refer to [https://www.intel.com/content/dam/altera-www/global/en_US/pdfs/literature/ug/ug_hdmi.pdf HDMI Intel® FPGA IP User Guide] and [https://www.intel.com/content/www/us/en/programmable/documentation/aky1476080261496.html#dtb1476836047579 Intel FPGA HDMI Design Example User Guide for Intel Arria 10 Devices]. | Figure 1-2 shows the system block diagram of this example. It shows that the Intel® FPGA HDMI IP core is used in the FPGA. It is divided into two parts: Transmitter and Receiver. These two IPs can be directly used by Transition-minimized differential signaling (TMDS) interface connection, only need HDMI repeater or redrive IC as an intermediary to connect HDMI devices, no need to use special HDMI Transmitter and Receiver IC. For details about HDMI IP, please refer to [https://www.intel.com/content/dam/altera-www/global/en_US/pdfs/literature/ug/ug_hdmi.pdf HDMI Intel® FPGA IP User Guide] and [https://www.intel.com/content/www/us/en/programmable/documentation/aky1476080261496.html#dtb1476836047579 Intel FPGA HDMI Design Example User Guide for Intel Arria 10 Devices]. | ||
| + | |||
| + | [[File:DE10-Advanced revc demo hdmi tx rx 4k bd.jpg|800px]] | ||
| + | |||
| + | ::::::::'''Figure 1-2 The system block of the demonstration''' | ||
This demonstration first needs to connect the DE10-Advanced to the HDMI interface screen. Because this demo can support various screen resolutions. When the DE10-Advanced connect to the monitor, the HDMI RX block in the FPGA will first read the supporting resolution of the monitor from the it's EDID and stored in the EDID RAM in the HDMI RX block. The NIOS handles the control signals between the EDID and the HDMI IP in this demo. | This demonstration first needs to connect the DE10-Advanced to the HDMI interface screen. Because this demo can support various screen resolutions. When the DE10-Advanced connect to the monitor, the HDMI RX block in the FPGA will first read the supporting resolution of the monitor from the it's EDID and stored in the EDID RAM in the HDMI RX block. The NIOS handles the control signals between the EDID and the HDMI IP in this demo. | ||
| Line 9: | Line 16: | ||
The HDMI Video player is then connected to the HDMI RX port of the DE10-Advanced. When the RX instance in the FPGA receives a video source from the external video generator, the video and audio data then goes through a loopback FIFO before it is transmitted to the TX instance. The final image and sound data will be displayed on the monitor connected to the TX end. For a more detailed IP block diagram in the example, refer to Figure 1-3. | The HDMI Video player is then connected to the HDMI RX port of the DE10-Advanced. When the RX instance in the FPGA receives a video source from the external video generator, the video and audio data then goes through a loopback FIFO before it is transmitted to the TX instance. The final image and sound data will be displayed on the monitor connected to the TX end. For a more detailed IP block diagram in the example, refer to Figure 1-3. | ||
| - | + | [[File:DE10-Advanced revc demo hdmi tx rx 4k ip block.png|700px]] | |
| + | ::::::::'''Figure 1-3 The HDMI IP block of the demonstration''' | ||
=Demonstration Source Code= | =Demonstration Source Code= | ||
| Line 17: | Line 25: | ||
*Nios II Eclipse: HDMI_RX_TX\software\ | *Nios II Eclipse: HDMI_RX_TX\software\ | ||
*Demonstration Batch File: | *Demonstration Batch File: | ||
| - | * | + | *:Demo Batch File Folder: HDMI_RX_TX\demo_batch\ |
| - | + | *:The demo batch file includes following files: | |
| - | + | **Batch File for USB-Blaseter II: test.bat, test.sh | |
| - | + | **FPGA Configure File: a10_hdmi2_demo.sof | |
| - | + | **Nios II Program: HDMI_TX_RX.elf | |
=Hardware Requirement= | =Hardware Requirement= | ||
| - | * | + | *a PC |
| - | * | + | *An HDMI monitor capable of displaying 4K/60P |
| - | + | *An HDMI video player capable of outputting 4K/60P resolution | |
| + | |||
| + | =Demonstration Setup= | ||
#Make sure Quartus Prime and Nios II are installed on your PC. | #Make sure Quartus Prime and Nios II are installed on your PC. | ||
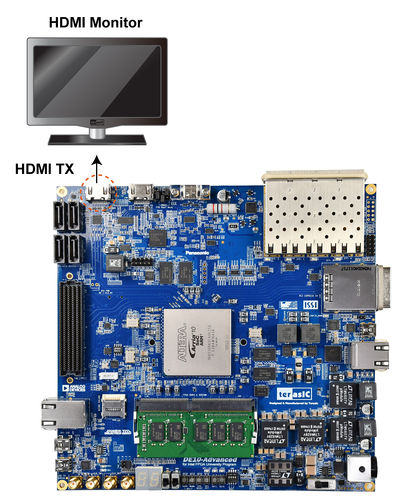
| - | #Connect a HDMI monitor to the DE10-Advanced as shown in Figure 1- | + | #Connect a HDMI monitor to the DE10-Advanced as shown in Figure 1-4. |
| + | #:[[File:DE10-Advanced revc demo hdmi tx rx 4k tx set.jpg|400px]] | ||
| + | #:::::'''Figure 1-4 Connection setup of the HDMI TX monitor and DE10-Advanced | ||
#Connect the USB Blaster II port on the DE10-Advanced to the computer using the usb cable (do not connect the HDMI video player at this time). | #Connect the USB Blaster II port on the DE10-Advanced to the computer using the usb cable (do not connect the HDMI video player at this time). | ||
#Open DE10-Advanced power and execute demo batch file : test.bat | #Open DE10-Advanced power and execute demo batch file : test.bat | ||
#Waiting for FPGA code download completed | #Waiting for FPGA code download completed | ||
| - | #First set the output resolution of the HDMI video plalyer to 4K@60Hz and connect to the HDMI RX port of DE10-Advanced as shown in Figure | + | #First set the output resolution of the HDMI video plalyer to 4K@60Hz and connect to the HDMI RX port of DE10-Advanced as shown in Figure 1-5 |
| - | #Oberve the Nios command shell window, whether the Pixel rate is around 297000 (the value when the resolution is 4K). | + | #:[[File:DE10-Advanced revc demo hdmi tx rx 4k 1-1.jpg|400px]] |
| - | #Check if the resolution of the HDMI monitor is 4K | + | #::::'''Figure 1-5 Connection setup of the HDMI Video Player and DE10-Advanced |
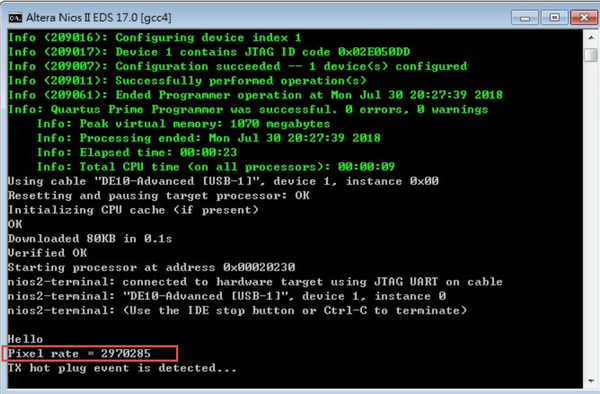
| - | If the HDMI video player cannot automatically switch , please manually switch to the resolution that monitor can support. | + | #Oberve the Nios command shell window(See Figure 1-6), whether the Pixel rate is around 297000 (the value when the resolution is 4K). |
| + | #:[[File:DE10-Advanced revc demo hdmi tx rx 4k check pxiel.png|600px]] | ||
| + | #::::'''Figure 1-6 Verify the pixel rate of the demonstration | ||
| + | #Check if the resolution of the HDMI monitor is 4K/60P. If the monitor cannot support 4K resolution, some HDMI video players will automatically switch to full HD or lower resolution.If the HDMI video player cannot automatically switch , please manually switch to the resolution that monitor can support. | ||
| + | |||
| + | '''[[DE10-Advance_Demonstration_Manual_revC#Chapter 2 Examples For FPGA|Back]]''' | ||
Latest revision as of 16:19, 29 August 2018
This demonstration uses the Intel® FPGA HDMI IP core to implement the HDMI Retransmit function in the FPGA of the DE10-Advanced. As shown in Figure 1-1, User can connect an HDMI video player to the to input video and audio data to HDMI RX port of the DE10-Advanced. After the HDMI video data is received in the FPGA, it will be instantly transferred to the HDMI TX port. The user only needs to connect an HDMI screen to the DE10-advaned. User only needs to connect an HDMI screen to the DE10-advanced, then you can watch the images output by the HDMI Player. This demonstration supports image resolution up to 4K60P. If you want to learn HDMI high-performance related image processing, this demo can help you learn quickly.

- Figure 1-1 The Architecture of the demonstration
Contents |
System Block Diagram
Figure 1-2 shows the system block diagram of this example. It shows that the Intel® FPGA HDMI IP core is used in the FPGA. It is divided into two parts: Transmitter and Receiver. These two IPs can be directly used by Transition-minimized differential signaling (TMDS) interface connection, only need HDMI repeater or redrive IC as an intermediary to connect HDMI devices, no need to use special HDMI Transmitter and Receiver IC. For details about HDMI IP, please refer to HDMI Intel® FPGA IP User Guide and Intel FPGA HDMI Design Example User Guide for Intel Arria 10 Devices.

- Figure 1-2 The system block of the demonstration
This demonstration first needs to connect the DE10-Advanced to the HDMI interface screen. Because this demo can support various screen resolutions. When the DE10-Advanced connect to the monitor, the HDMI RX block in the FPGA will first read the supporting resolution of the monitor from the it's EDID and stored in the EDID RAM in the HDMI RX block. The NIOS handles the control signals between the EDID and the HDMI IP in this demo.
The HDMI Video player is then connected to the HDMI RX port of the DE10-Advanced. When the RX instance in the FPGA receives a video source from the external video generator, the video and audio data then goes through a loopback FIFO before it is transmitted to the TX instance. The final image and sound data will be displayed on the monitor connected to the TX end. For a more detailed IP block diagram in the example, refer to Figure 1-3.

- Figure 1-3 The HDMI IP block of the demonstration
Demonstration Source Code
Projet Loacation : System CD\Demonstration\FPGA\HDMI_RX_TX\
- Quartus Project directory: HDMI_RX_TX\quartus\
- Nios II Eclipse: HDMI_RX_TX\software\
- Demonstration Batch File:
- Demo Batch File Folder: HDMI_RX_TX\demo_batch\
- The demo batch file includes following files:
- Batch File for USB-Blaseter II: test.bat, test.sh
- FPGA Configure File: a10_hdmi2_demo.sof
- Nios II Program: HDMI_TX_RX.elf
Hardware Requirement
- a PC
- An HDMI monitor capable of displaying 4K/60P
- An HDMI video player capable of outputting 4K/60P resolution
Demonstration Setup
- Make sure Quartus Prime and Nios II are installed on your PC.
- Connect a HDMI monitor to the DE10-Advanced as shown in Figure 1-4.
- Figure 1-4 Connection setup of the HDMI TX monitor and DE10-Advanced
- Connect the USB Blaster II port on the DE10-Advanced to the computer using the usb cable (do not connect the HDMI video player at this time).
- Open DE10-Advanced power and execute demo batch file : test.bat
- Waiting for FPGA code download completed
- First set the output resolution of the HDMI video plalyer to 4K@60Hz and connect to the HDMI RX port of DE10-Advanced as shown in Figure 1-5
- Figure 1-5 Connection setup of the HDMI Video Player and DE10-Advanced
- Oberve the Nios command shell window(See Figure 1-6), whether the Pixel rate is around 297000 (the value when the resolution is 4K).
- Figure 1-6 Verify the pixel rate of the demonstration
- Check if the resolution of the HDMI monitor is 4K/60P. If the monitor cannot support 4K resolution, some HDMI video players will automatically switch to full HD or lower resolution.If the HDMI video player cannot automatically switch , please manually switch to the resolution that monitor can support.

