DE10 Advance revC demo: HDMI TX in 4K Resolution
From Terasic Wiki
(→System Block Diagram) |
(→System Block Diagram) |
||
| Line 9: | Line 9: | ||
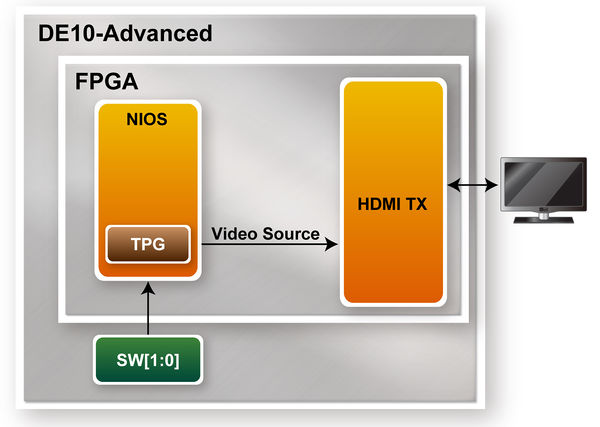
[[File:DE10-Advanced revc demo hdmi tx 4k bd.jpg|600px]] | [[File:DE10-Advanced revc demo hdmi tx 4k bd.jpg|600px]] | ||
::::'''Figure 1-1 The System Block Diagram of the demonstration''' | ::::'''Figure 1-1 The System Block Diagram of the demonstration''' | ||
| + | |||
| + | =Design Tools= | ||
| + | *Quartus Prime 18.0.0 Standard Edition | ||
| + | *Nios II Software Build Tools for Eclipse 18.0 | ||
| + | |||
| + | |||
| + | =Demonstration Source Code= | ||
| + | Projet Loacation : System CD\Demonstration\FPGA\HDMI_TX_4K\ | ||
| + | *Quartus Project directory: HDMI_TX_4K | ||
| + | *Nios II Eclipse: HDMI_TX_4K\software\ | ||
| + | *Demonstration Batch File: | ||
| + | ** Demo Batch File Folder: HDMI_TX_4K\demo_batch\ | ||
| + | The demo batch file includes following files: | ||
| + | ***Batch File for USB-Blaseter II: test.bat, test.sh | ||
| + | *** FPGA Configure File: HDMI_TX_4K.sof | ||
| + | *** Nios II Program: vip_control.elf | ||
| + | |||
| + | =Hardware Requirement= | ||
| + | *一台能顯示4K60HZ的HDMI monitor | ||
| + | * 一台PC | ||
| + | |||
| + | =Demonstration Setup= | ||
| + | |||
| + | 1. | ||
| + | Make sure Quartus Prime and Nios II are installed on your PC. | ||
| + | 2. | ||
| + | 將HDMI monitor.並連接至 DE10-Advanced 如圖1-3 所示. | ||
| + | 3. | ||
| + | 將DE10-Advanced上的USB Blaster II port使用 usb cable與電腦連接. | ||
| + | 4. | ||
| + | 開啟DE10-Advanced power , 執行 demo batch file : test.bat | ||
| + | 5. | ||
| + | 等待FPGA code 下載完成. | ||
| + | 6. | ||
| + | 觀看HDMI monitor 是否有出現test pattern 的 color bar 畫面. | ||
| + | 7. | ||
| + | 用戶可以切換SW[1:0]來改變test patter輸出的解析度, 詳細的螢幕解析度與開關對應的關係如Table 1-1 所示 | ||
Revision as of 16:19, 29 August 2018
Contents |
Introduction
Compared with the Section 2.7 HDMI Retransmit demo, the difference of this demonstration is that only the TX of the Intel® FPGA HDMI IP cores is used in the FPGA. This demo also has a video test pattern generator built into the FPGA. The highest resolution 4K image is sent to the HDMI TX IP. It is displayed via an external HDMI monitor.
System Block Diagram
Figure 1-1 shows the system block diagram of the demo. First, Nios is used to generate the test pattern output to the HDMI TX IP. The resolution of the generated pattern can be 4K or Full HD(1080). User can switch the output resolution instantly through the Switch on the DE10-Advanced. The HDMI TX IP is identical to Section 2.7.
- Figure 1-1 The System Block Diagram of the demonstration
Design Tools
- Quartus Prime 18.0.0 Standard Edition
- Nios II Software Build Tools for Eclipse 18.0
Demonstration Source Code
Projet Loacation : System CD\Demonstration\FPGA\HDMI_TX_4K\
     *Quartus Project directory: HDMI_TX_4K
     *Nios II Eclipse: HDMI_TX_4K\software\
     *Demonstration Batch File:
       ** Demo Batch File Folder: HDMI_TX_4K\demo_batch\
           The demo batch file includes following files:
               ***Batch File for USB-Blaseter II: test.bat, test.sh
               *** FPGA Configure File: HDMI_TX_4K.sof
               *** Nios II Program: vip_control.elf
Hardware Requirement
   *一台能顯示4K60HZ的HDMI monitor
   * 一台PC
Demonstration Setup
1. Make sure Quartus Prime and Nios II are installed on your PC. 2. 將HDMI monitor.並連接至 DE10-Advanced 如圖1-3 所示. 3. 將DE10-Advanced上的USB Blaster II port使用 usb cable與電腦連接. 4. 開啟DE10-Advanced power , 執行 demo batch file : test.bat 5. 等待FPGA code 下載完成. 6. 觀看HDMI monitor 是否有出現test pattern 的 color bar 畫面. 7. 用戶可以切換SW[1:0]來改變test patter輸出的解析度, 詳細的螢幕解析度與開關對應的關係如Table 1-1 所示
